Ellipses aside... this is pretty much truth.
“The longer I live, the more I realize the impact of attitude on life. Attitude, to me, is more important than facts. It is more important than the past, the education, the money, than circumstances, than failure, than successes, than what other people think or say or do. It is more important than appearance, giftedness or skill. It will make or break a company... a church... a home. The remarkable thing is we have a choice everyday regarding the attitude we will embrace for that day. We cannot change our past... we cannot change the fact that people will act in a certain way. We cannot change the inevitable. The only thing we can do is play on the one string we have, and that is our attitude. I am convinced that life is 10% what happens to me and 90% of how I react to it. And so it is with you... we are in charge of our Attitudes.” - Chuck Swindoll
I have little control over the bull being handed to me, but I'll be damned if I'll let it consume me. I am always in control of my reactions.
Life is, mostly, how you react to it.
Apr 6, 2012
Oh, hi there.
I'm back. I think. Hell, I don't really know anymore.
These past few months have been such a whirlwind for me, it's hard to know whether I'm coming or going. Each day is a feat just to survive, let alone manage to pull together any semblance of grace and poise out of my life. Humor has been waning, and it's hard to write about the silly parts of my life when a lot of times I just want to say fuck it.
But that's not even an option any longer -- so here I am!
There are somethings I just can't talk about on here. Minors are involved, and lawyers, judges and all the terrifying reality of a person that's supposed to be a parent and is instead working every day to make your life a living hell. But, there are somethings that I can still talk about.
Like my god awful dogs (Bitsy managed to get herself stuck in a corner, fall off a counter top, and toboggan down the stairs since last we've talked), a rock-wall I've coerced the manchild into making, and the antics of some friends I have fallen into which are very dear to my soul.
Life is not easy. But, life is good. It's all in what you make of it. And I've never believed that more than I do now.
Jul 20, 2011
How to distress a wall... a tutorial with pictures
The first thing to know about distressing a wall is that, once you do it, one of your walls will be essentially destroyed. If you ever want to change that wall, or paint it, or need to sell, or the rapture is here and you have to split... you can change the color on top but the texture ain't goin' anywhere. Your wall will look like a crumbling 100 year old wall in the end, which is sweet, but it's a commitment. Just my warning label for whatever it's worth. Also, before I start credit must be given to Reclaimed Home's blog. Their process was what I followed, and though they give a good base of what to do there are a lot of grey areas. I'm just filling is on the areas that we needed clarification on, and as we figured out along the way. There were a few times we were all , wait, what the fuck do we do now?
The colors I used - from least shown to most shown
Gold
Blue
Light Grey
Dark Grey
White and tinted Joint Compound
Tools you'll need
Paint
Crackle
Joint Compound
Craft Paper
Brushes (all of the color was hand brushed on)
Trowel and bucket
Blankets / drop cloth to put on floor
Tools you'll need
Paint
Crackle
Joint Compound
Craft Paper
Brushes (all of the color was hand brushed on)
Trowel and bucket
Blankets / drop cloth to put on floor
Ladder
Step One
The first thing you do is get joint compound. We bought a five gallon bucket for the wall which is about 20 ft by 15 ft. I've never actually measured it. I'm just eyeballing it. The joint compound we purchased was Sheetrock All Purpose Lightweight Joint Compound. No specific reason other than that's what they carried at the store. This is a bright, primer white. You get a trowel and spread the joint compound all over your wall.
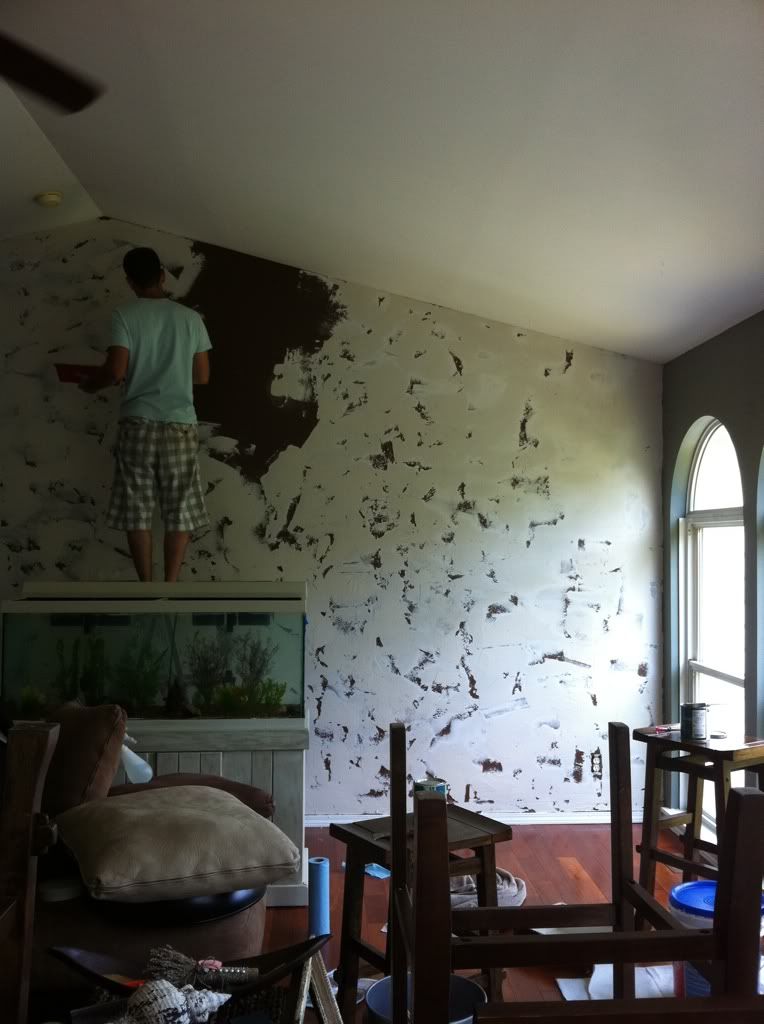
You do not want this smooth and pretty. You want it patchy, thicker in some areas, and places where it's missing completely. You'll let this dry. Took about 4 hours with a fan on it.
Something I wish I would have done differently - I didn't realize that you would see this layer of joint compound. When you rip through to get your distressed look at the end, it will pull straight down to the base coat in some places. For me that was the dark brown that was previously on the wall, and the white joint compound. I wish I had pulled half of the compound out and tinted it a grey color before putting it on the wall. It would have added a bit more depth.
Step Two
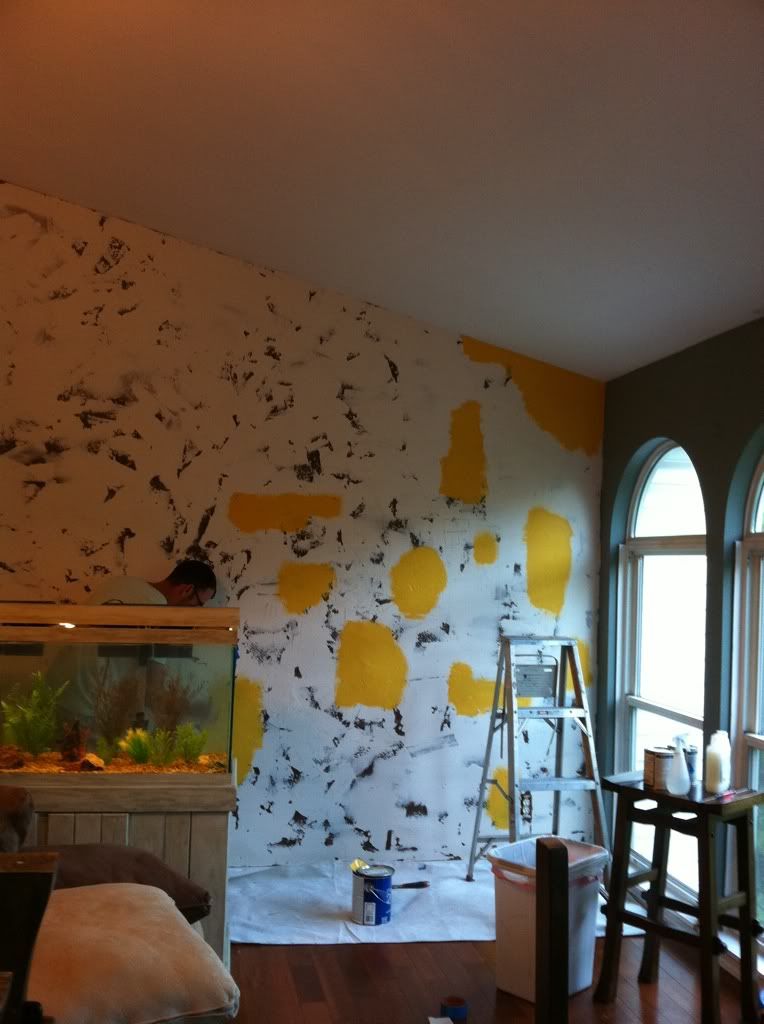
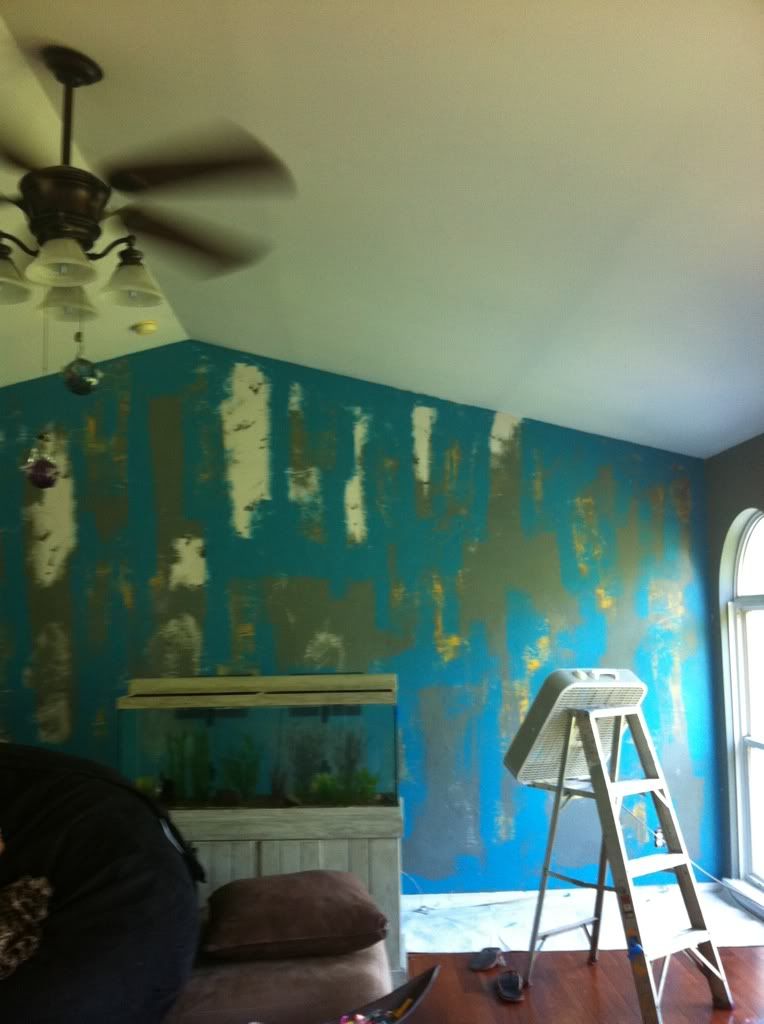
After the joint compound dries completely add the color you want to see the least on your wall. For me this was a gold. Depending on your color pallet, this will be different. Put it up patchy and in no random order. Make sure your spots aren't just linear which is something that we started doing at first. Make some of them more oval and oblong.
Step Three
Apply weathered crackle to the top of the yellow color in random places. I used a quart of Valspar weathered crackle for the next handful of steps where you add color, dry, add crackle, dry.... (We used two quarts for the whole wall). You'll want to cover most of the yellow with it, but it's not an exact science. Leave a some areas without it. You'll do this every time you put a new color on top of another color. Let this dry for whatever time the package says. Ours was an hour. We had a fan on it so we cheated a bit with the time. I'm not condoning cheating.
Step Four
Next we covered most of the wall in the lighter grey. You can see we covered a good portion of the yellow up.
You can see how the overlapping colors with the crackle between them will start to, well, crackle. It's pretty rad.
Step Five
Add more crackle on top of the grey in random spots. Let dry.
Step Six
Add the color you want to see the second most of. For us, this was a blue. We applied this in the same patchy way we put the yellow on the wall. Let it dry.
Step Seven
Add crackle on top of the blue. Let it dry. Then we added a darker grey on top of the blue, leaving a bit of it hanging out. This will crackle in the same way that the yellow did. By this point most of your wall should be covered. You can keep doing this as many times as you would like, and with as many different colors as you like. There is no rhyme or reason to it. At this time we've used the first quart of crackle.
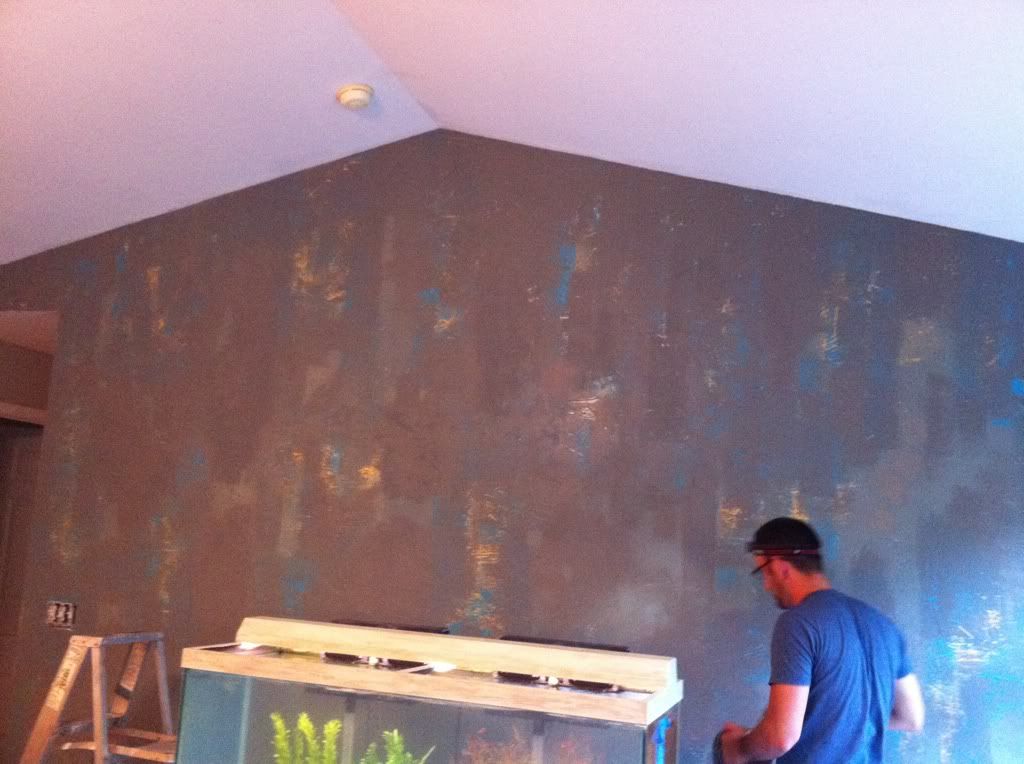
Step Eight
Put crackle on top of most of the wall. This will cause the joint compound you're about to put back onto it to crackle, so don't be too skimpy on it. We used all of the second quart of crackle on this step. Let it dry.
Step Nine
Here is where things are the trickiest, but it's not that terrible. Stick with me. We tinted the joint compound with the darker grey color. Now you want to trowel on the compound into small areas.
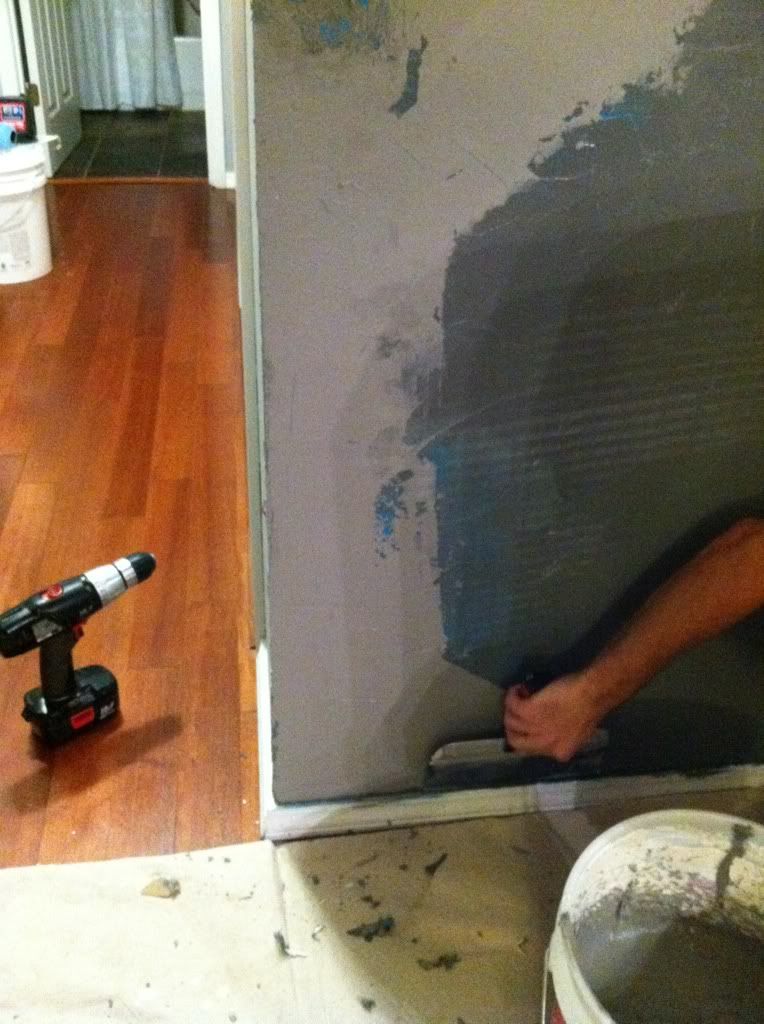
Add craft paper ontop of the wet compound and let it almost set. Craft paper is the same thing as brown wrapping paper. I got mine from the paint store.You'll press this into the wall and help smooth it out. The pressing will really make it look like a plaster wall. You can press harder in some areas and lighter in others. You'll get the hang of it. You can't mess it up.
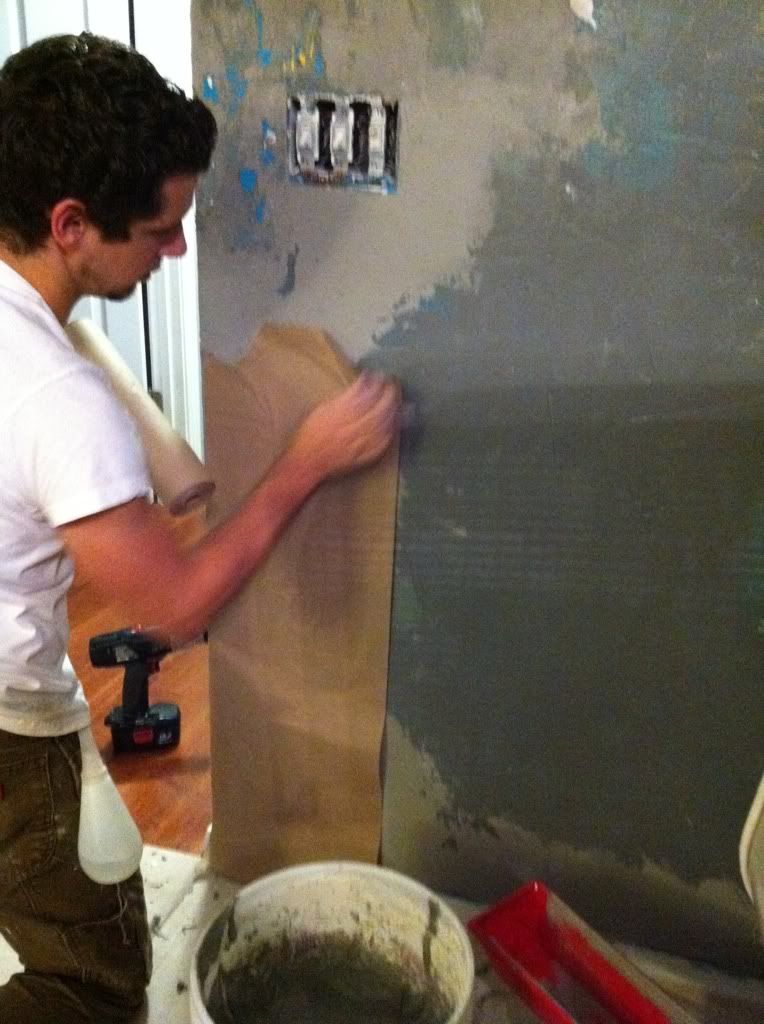
Step Ten
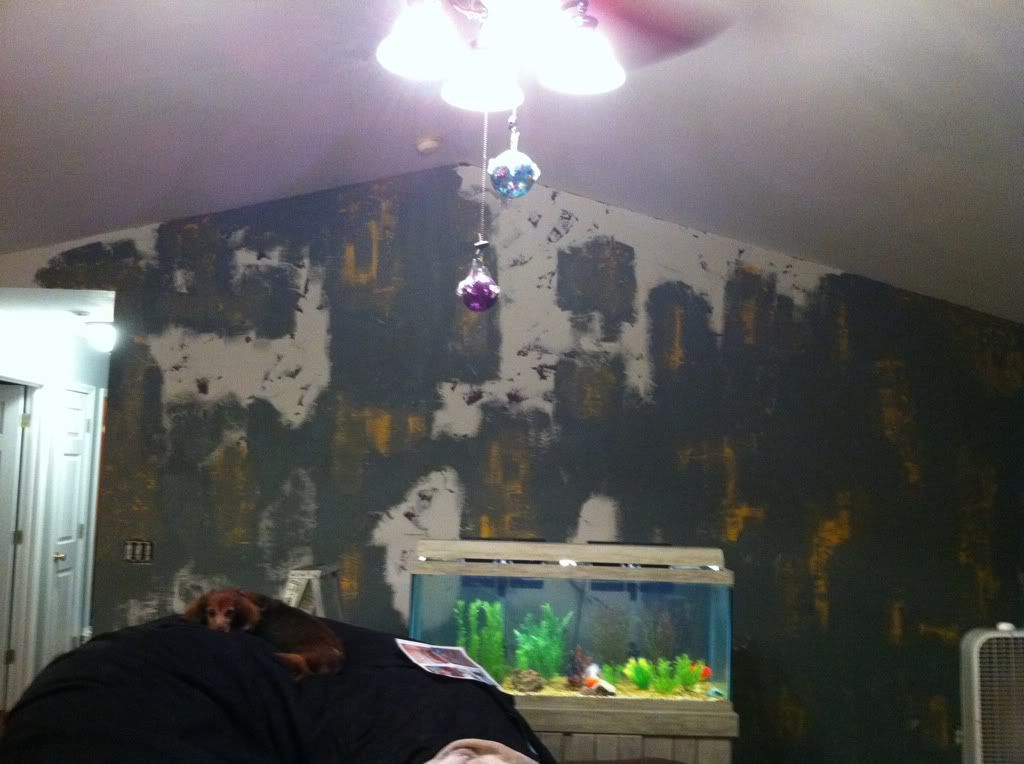
This was the hardest part. After it sets just enough you'll want to pull the craft paper off the wall. It's hard to find that sweet spot where the compound has set enough, but not too much. If you pull too soon the paper will pull off and the compound will stay on and you wont see any of the color underneath. If you pull too late the paper will dry to the compound. We had to play around to figure it out, and you'll have to do the same. We had a squirt bottle to mist the walls in case it got too dry, and used our trust old fan as well. When you rip off the paper you'll start to see your texture and bottom colors pull through.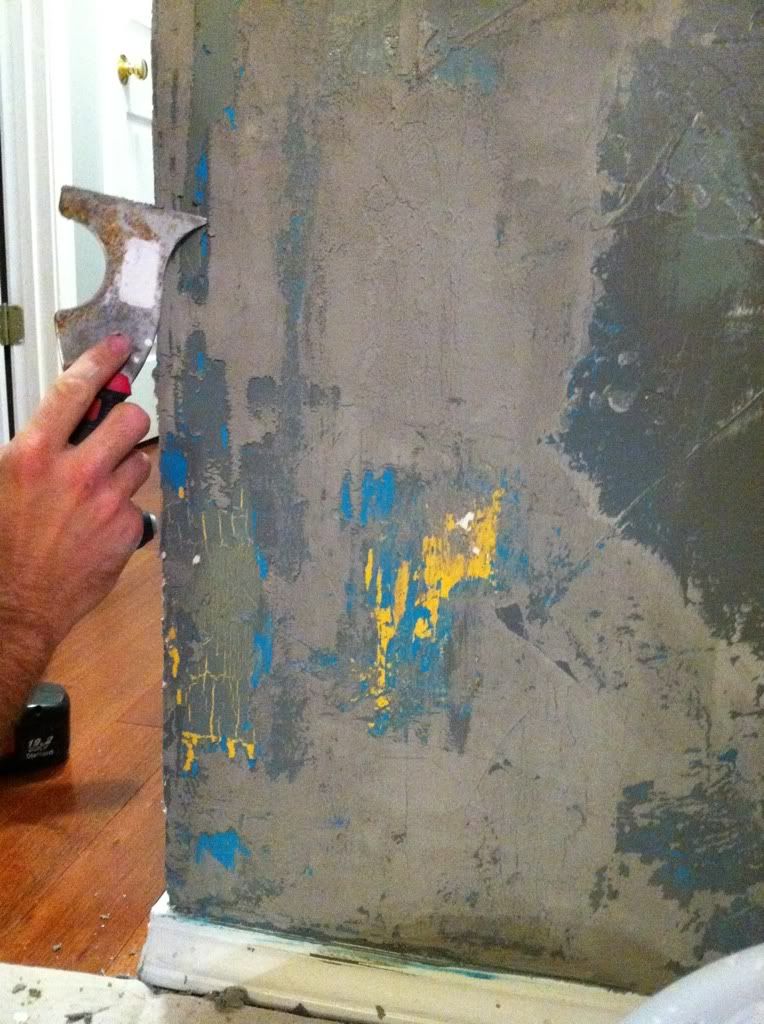
We used that little thingymabob tool to gently pull off any additional layers, and make more color pull through.This is up to you how you want it to look.
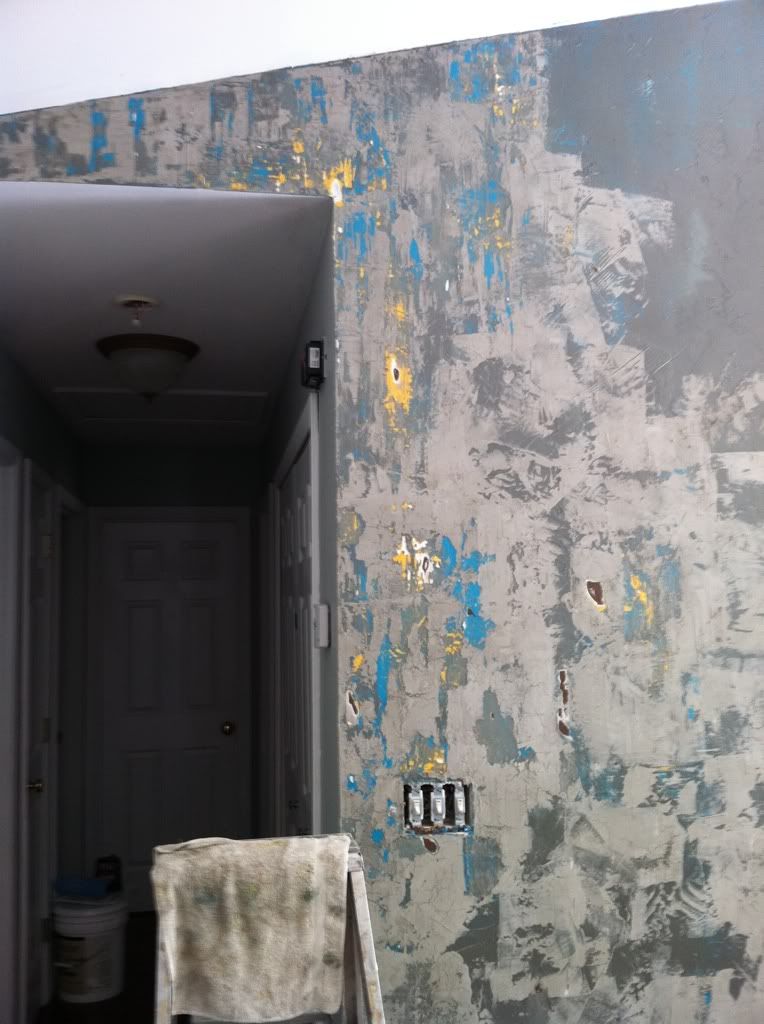
You can see in these pictures how all of the colors pull through. The light/dark greys, yellow and blue. Even the white from the first layer of joint compound and the original wall.
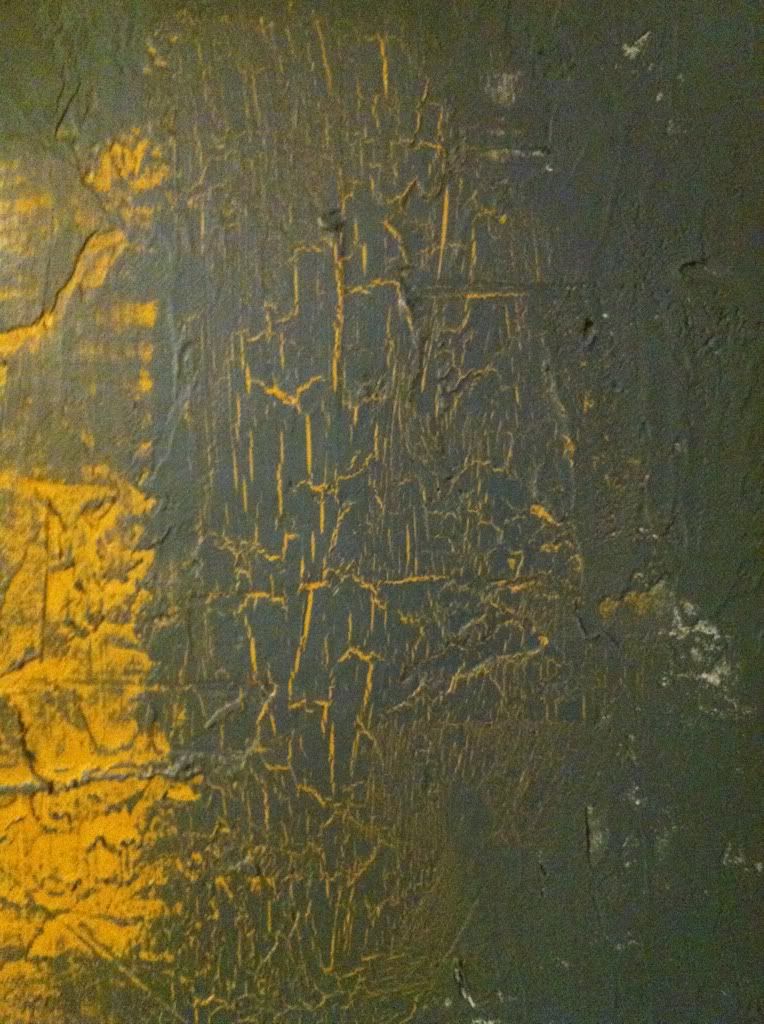
Here is a closer view of the texture. You can see in this last picture what color the joint compound was wet, and in the picture before the lighter grey that it dried. I like the darker color, so we will be going back in and darkening up some of the dried joint compound with stain.
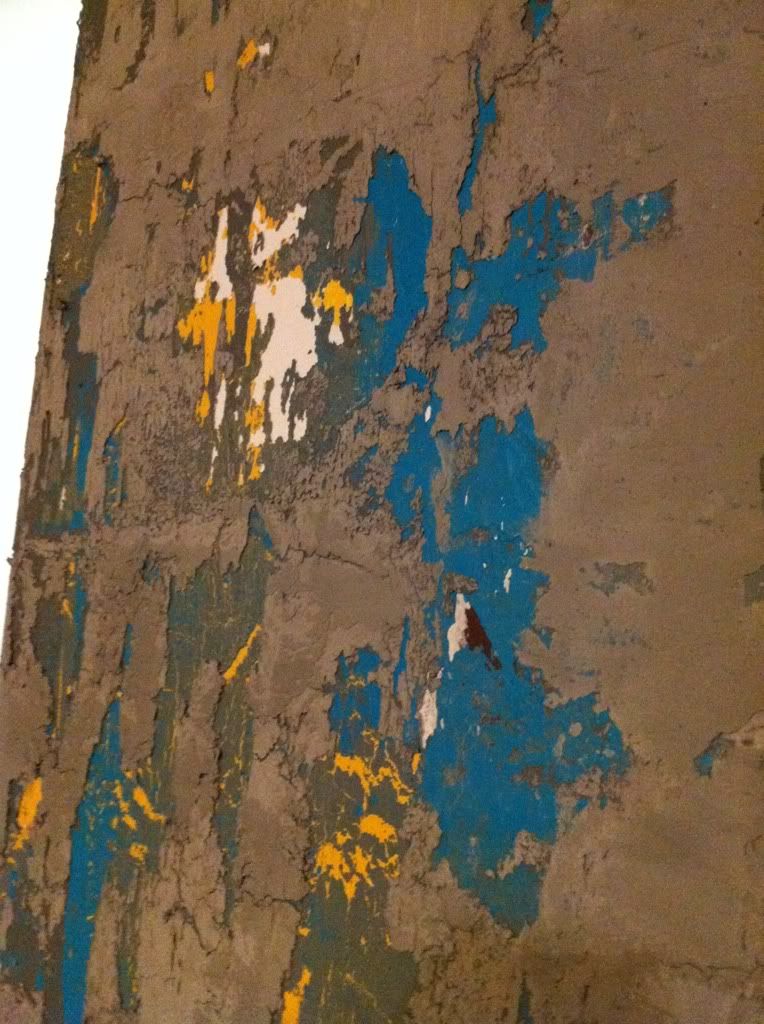
We're not finished yet, but I'm loving the way it's turning out thus far. It's been a hell of a lot of work for one wall, but it's going to be so unique when we're finished. Manchild and the Cowboy are ready to kill me, I'm sure, and I can't say I blame them. More to come as we finish!
Go big or go home
I can do nothing half way. I'm an all or nothin' kind of gal. Whenever I make up my mind to do something, you better bet we're doing it in a big way. When we first bought our house it was a foreclosure. People thought cleaning the years of neglect and grim off of it, and slapping some paint on the walls would be satisfactory. Unfortunately for them, and the manchild, that wasn't going to cut it. All the carpet had to go. Hardwood and slate floors were put down. Bathrooms were re-tiled, a wall was taken out, the kitchen (stove, fridge, cabinets) were rearranged, and everything that wasn't moving was painted. All within the month time limit we had to get the hell out of the apartment we were renting.
We hustled.
Unfortunately with the hustling came some rash decisions. I had a general idea of the paint I wanted up on the walls, but with everything else going on I didn't spend too much time thinking about how I wanted things to flow. I went to the paint store, picked out some of my favorite colors and threw them up. The results weren't horrible, but it never felt right.


Earth tones and orange. I'm predictable. Don't judge. In a sudden fit of insanity stemming from lord knows what, I decided that EVERYTHING. MUST. CHANGE.This time around I spent quite a bit of time figuring out what it is that makes me happy. Pinterest played a huge part in helping me to organize those feelings and ideas into some semblance of order. I made a pinboard for things I wanted to see in my house. Best idea I've ever had. When I told people what it was I wanted to do they either looked at me like I had two heads or thought I was going for country/shabby chic. When I showed them the pinboard they still didn't have a word for it, but they understood the general feel.
One thing that was crucial to my happiness in this house was a distressed wall. I wanted an old, peeling 100 year old plaster wall finish on one wall in my house. I wanted to have the overtones be the general greys that I had picked out for my living room / kitchen with beautiful blues and yellows showing underneath. Something along the lines of this, only with my colors.

Thanks to the internet, a girl can have whatever it is she wants. We found a tutorial online, bought all the supplies needed, and went to work. It took us a week, and an extensive use of colorful language, but it's almost finished. Process pictures up soon!
We hustled.
Unfortunately with the hustling came some rash decisions. I had a general idea of the paint I wanted up on the walls, but with everything else going on I didn't spend too much time thinking about how I wanted things to flow. I went to the paint store, picked out some of my favorite colors and threw them up. The results weren't horrible, but it never felt right.

Earth tones and orange. I'm predictable. Don't judge. In a sudden fit of insanity stemming from lord knows what, I decided that EVERYTHING. MUST. CHANGE.This time around I spent quite a bit of time figuring out what it is that makes me happy. Pinterest played a huge part in helping me to organize those feelings and ideas into some semblance of order. I made a pinboard for things I wanted to see in my house. Best idea I've ever had. When I told people what it was I wanted to do they either looked at me like I had two heads or thought I was going for country/shabby chic. When I showed them the pinboard they still didn't have a word for it, but they understood the general feel.
One thing that was crucial to my happiness in this house was a distressed wall. I wanted an old, peeling 100 year old plaster wall finish on one wall in my house. I wanted to have the overtones be the general greys that I had picked out for my living room / kitchen with beautiful blues and yellows showing underneath. Something along the lines of this, only with my colors.
Thanks to the internet, a girl can have whatever it is she wants. We found a tutorial online, bought all the supplies needed, and went to work. It took us a week, and an extensive use of colorful language, but it's almost finished. Process pictures up soon!
Jun 24, 2011
Conservatitve Area
I was driving into work today and saw a sign for a Conservative Area. This confused me for all of three seconds, then I realized that the sign was actually for a Conservation Area. I was crushed. I was hoping to see a herd of angry white men corralled together, doing whatever it is that conservative people do on a regular basis in their natural habitat. I would take pictures. Llife would be grand. Clearly I have issues with reading signs.
Take people for instance. No one person in particular, but you know, people. The general kind. Add my interactions with them, and cue disaster. My inherent flaw with dealing with anyone is I take them for their word. 100%. No questions asked. You say you are going to do something, and I'll hold you to it. That's just dumb. People say things they don't mean. I'm always a bit confused why, but it is what it is I guess. I'm good with people, but (there's always a but), I'm too lenient with my 'benefit of the doubt giving.' I can excuse someone's behavior like no other. It's one of my superpowers, actually. No, who am I trying to kid? I just blow at reading the signs. I know better than to take too much stock in others' words and for fuck sake I need to stop. But I wont. Half the fun in meeting someone new is believing in them.
Internet, lets make a deal. You tell me something, and I'll believe you. Because, you know, we're tight, and that's how things should be. (I wont hold you accountable for your families chain mail sending, because I know you can't help them). In return, I'll keep telling you things, like how I single-handedly funded a child's cult upbringing with a cookie purchase, and how I managed to put my bra on inside out.
Deal?
Apr 23, 2011
My Four
I have a pretty kick ass assignment due in my English class. It could be my favorite paper I've ever been asked to write. For the final assignment of this semester we were asked to read Frankenstein and to focus on chapter 14. If you haven't read the novel, this is where the Creature finds four books (after learning how to read by creeping on the cottagers) which, after reading them, comprises of his entire education. We were then asked to evaluate Mary Shelley's choice of books, and pick four books of our own to educate our very own little creature.
This has taken way more thought that I would have ever dreamed. I can pump out papers pretty easily, but there is something about this assignment that is making me really stop and think. I've had a hell of a time coming up with my four books. What is it that I want to teach a creature about life in the first place? Which books eloquently and adequately express those philosophies through their pages? How do I do this without sounding like a total... blowhard? I've made so many lists of books that I'm starting to worry I'm over thinking this assignment a bit too much. I've asked everyone that I know what their list of books would be looking for a bit of inspiration. Everyone has had different selections. It's just so personal, especially if you're a reader.
Well done, professor. You've successfully provided me with a paper that has caused me to think, not bullshit. Other than fiction writing, this has been a very rare occurrence.
So, right, my list. I'm writing it down here so I can't change it. I just have my books selected at this point, and I still need to write the actual paper...
- Alice's Adventures in Wonderland - Charles Dodgson. Alice laughed. "There's no use trying," she said: "one can't believe impossible things." "I daresay you haven't had much practice," said the Queen. "When I was your age, I always did it for half-an-hour a day. Why, sometimes I've believed as many as six impossible things before breakfast."
- Wuthering Heights - Emily Bronte. "My love for Linton is like the foliage in the woods; time will change it, I'm well aware, as winter changes the trees. My love for Heathcliff resembles the eternal rocks beneath--a source of little visible delight, but necessary. Nelly, I am Heathcliff! He's always, always in my mind--not as a pleasure, any more than I am always a pleasure to myself, but as my own being"
- Plan Bee - Susan Brackney "As I idly watch them fly from flower to flower and from flower to hive, I realize they have managed to slow my previously frenetic pace, to make me more appreciative of the workings of the universe, and to return me, at least a little bit, to simpler times."
- A Short History of Nearly Everything - Bill Bryson. "It is a slightly arresting notion that if you were to pick yourself apart with tweezers, one atom at a time, you would produce a mound of fine atomic dust, none of which had ever been alive but all of which had once been you."
You?
Apr 15, 2011
Transparency
Yesterday I was caught in the act of doing something I despise, and I was rightfully called out on it. I made a mistake. This is not something I find myself doing too often. That may sound conceited, but whatev. I make very few decisions without considering all of the consequences ahead of time. This prepares me for most things that may come my way. If I’m finding myself knee deep in some shit, it will be no surprise to me… plus it was probably worth it.
My mistake was pretty minor in the grand scheme of things. This time around, I wasn’t entirely forward, concise, or honest. With myself, mostly. Shame on me. I know better. I allowed myself to hesitate, and do some bush beating, instead of just spitting out what it was that I wanted. The uncertainty came from the risk. I wasn’t afraid of rejection, because that isn’t something that would hold me back in the least. I was more afraid of tainting the short time we have left.
Silly girl.
I find myself adhering to a basic philosophy for my life. Do something, or don’t. I try not to waste a moment mucking around in the wishy-washy middle ground of indecision. If you’re angry, address the issue or get the hell over it. If you want something from someone, ask. If you want to do something, quit freaking talking about it and make it happen. Whatever you do, do not pussy foot around. Do not be uspet with someone for not reading your mind. And, most importantly, do not expect someone to know what you want if you haven't told them. Assuming and hinting can make things complicated, and that is unnecessary. Even if the answer isn’t what you ultimately wanted it to be, at least you have been clear. In this case it worked out nicely in the end.
Lesson learned. Go me!
Subscribe to:
Posts (Atom)